
Bill Feiereisen, March 2, 2022

The Raspberry Pi is an inexpensive, single board computer that is celebrating its 10th anniversary this year. In these last ten years it has taken the educational, hobbyist and maker markets by storm, because of its large open source community, modest price and ease of programming. The RPi is now in its fourth generation and has spawned a family of products. The most powerful version, the RPi4, is about 100x faster than the original version of 2012.
The RPi runs a full Linux operating system, Raspberry Pi OS, which until recently has been a 32-bit implementation of Debian. Just officially introduced, and now out of beta, is the new 64-bit OS. For the moment, and until a new generation of RPi appears, this is likely the fastest combination of hardware and software. Before putting the computer to use for other purposes, I wanted to see how fast it is for scientific calculations and compare it to present computers as well as a historic scientific supercomputer that I worked on more than 40 years ago, the ILLIAC IV. This was done with High Performance Linpack (HPL) from netlib.org, a standard way of comparing scientific computers
Discussion
This test measured a Linpack speed of about 8 gigaflops (8 billion floating point operations per second). Although there has been much controversy about the value of Linpack as a measure of the speed of scientific computing, it has been performed on thousands of computers over the years and still serves as a common basis of comparison. It is the core measurement of the TOP500 list of supercomputers in the world. Mindful of these criticisms, here are four comparisons.
The fastest current supercomputer is Japan’s Fugaku machine (November 2021). Based upon Fujitsu’s custom ARM A64FX processor, it has over 7.6 million cores as compared to the four cores in my RPi4. It runs Linpack at 442 Petaflops which is only 55 million times faster than the Pi, but uses 30 megawatts of power as opposed to the 15 watts of the Pi. LOL!
A high end Intel workstation processor, the Intel Core-i9 7980XE has been measured at about 1,000 gigaflops and uses about 180 watts. It is about 125x faster than the Pi, but only uses about 12x the power
My iPhone 13 runs Linpack at about 8 gigaflops, so just about the same speed as the Pi. I will look for power consumption figures.
However on the historical end of the spectrum I wanted to compare the Pi to one of the original supercomputers, the ILLIAC IV. This is the computer upon which I performed my thesis work in the late 70s. It holds a special place in my heart as I spent several years working on computational simulation of turbulent fluid flows. I did not appreciate at that time what a ground-breaking development in the history of parallel computation the ILLIAC IV was. To me it was an underutilized computer to which I was given full reign. It was underutilized because it was so difficult to program, but as a grad student I had no reference upon which to judge this, so I spent days, weeks, months and years on it, doing my work.
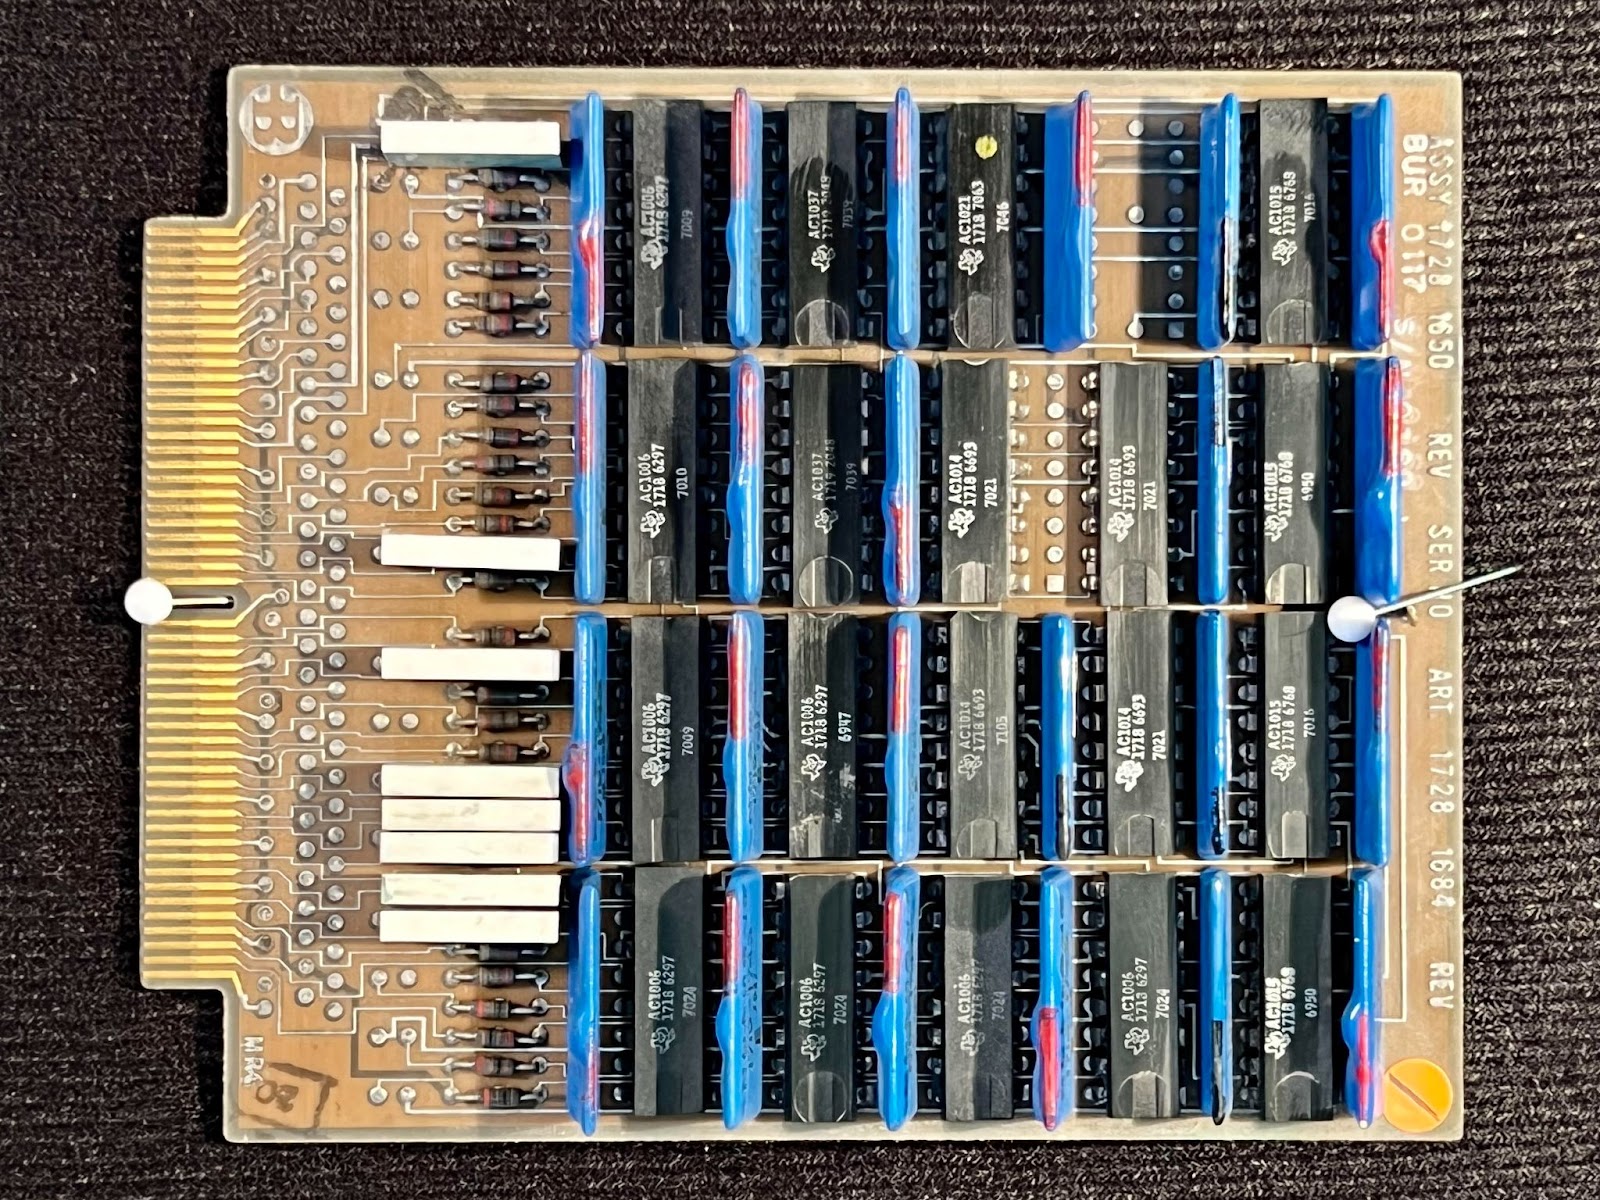
The late 70s were of course long before the TOP500, but speed measurements were still performed. It’s generally accepted that the ILLIAC IV ran about 100 megaflops, or about 1/80 of the speed of my $75 Raspberry Pi. I have been unable to find power measurements of this historical machine. It was disassembled in 1981. I was invited to the decommissioning party at which those who worked on the machine were invited to take a piece as a keep-sake. As a lowly grad student I was allowed to keep a memory board. Distinguished researchers received larger parts like disk-drives that I have heard were made into coffee tables. Here is my piece of the ILLIAC IV that I cherish.
I had originally planned to build a miniature supercomputing cluster out of multiple Raspberry Pis, but this test showed that the actual speed is likely to be considerably less than that delivered by a robust desktop computer based upon a modern Intel or AMD processor. An RPi cluster will not deliver the performance, but would still be a great teaching aid.
The following sections document my steps to perform the tests.
Preparing the RPi
My board is the 8gb version. It sports a Broadcom BCM2711, Quad core Cortex-A72 (ARM v8) 64-bit SoC @ 1.5GHz. I enclosed it in a plastic fan case and attached the 30mm fan leads to the GPIO pins GND and 3.3v. 3.3 volts appears to be sufficient for cooling while running all four cores at 100% and alleviates the noise of the fan at 5v. For these tests I attached a display to the HDMI port and a keyboard and mouse over USB.
The new 64-bit OS can be most easily downloaded from the Raspberry Pi Foundation and installed to the micro-SD card with their imaging app (https://www.raspberrypi.com/software/). For now one needs another computer to prepare the OS for installation. This app runs on Mac, Windows and Linux. Choose your favorite. I prepared mine on a Macintosh laptop.
Insert a fresh SD card into a reader attached to a USB port and start the app. Choose the 64-bit OS from the drop down menu. It’s in a second level menu. Scroll down. I chose the version with the full desktop interface. Choose the SD card as the target. Through the setting icon in the lower right, you can optionally choose your wifi network/password and set an initial login password for your account. Then write the card and pull it out.
Insert the card into the card slot on the RPi and power up. After many house-keeping chores and some questions the RPi will boot into the desktop with a fresh operating system. It will ask permission to download software updates. Say yes and let it do its thing.
Preparing the Benchmarking Software
The next steps will set up the benchmarking software and its dependencies. I used the ATLAS library (Automatically Tuned Linear Algebra Software) that supports the High Performance Linpack benchmark (HPL) running over a message passing interface (MPICH) to communicate with the four RPi cores.
The following steps were adapted and updated from a partially obsolete recipe that appeared on https://computenodes.net/2018/06/28/building-hpl-an-atlas-for-the-raspberry-pi/ in 2018.
ATLAS was installed from source. Since there is FORTRAN code in ATLAS install the gnu FORTRAN compiler in a terminal:
$ sudo apt install gfortran automake
ATLAS can be found at: https://sourceforge.net/projects/math-atlas/. Version 3.10.3 from 2016 appears to be the latest. Go to a convenient directory, download the archive and unpack:
    $ wget https://sourceforge.net/projects/math-atlas/files/Stable/3.10.3/atlas3.10.3.tar.bz2
    $ tar xjvf atlas3.10.3.tar.bz2
Create a directory in which to build (it is not recommended to build in the source tree) and go there:
    $ mkdir atlas-build
    $ cd atlas-build/
Disable CPU throttling on the RPi. The RPi normally changes its clock speed depending on several factors including its own temperature. With the CPU speed varying upon outside factors, benchmarking measurements mean little, so shut down throttling. During the build ATLAS will detect if you have forgotten and stop you in any case. This is done through the standard Linux device system that also allows overclocking. But don’t overclock this time.
    $ echo performance | sudo
        tee /sys/devices/system/cpu/cpu0/cpufreq/scaling_governor
The file “scaling_governor” is switched from “ondemand” to “performance.” You can always switch back later. This stops throttling, but also shuts down overheat protection on the CPU, so it’s a good idea to run a cooling fan as described above. And I used a simple python script in a separate terminal window to monitor the CPU temperature through the rest of this exercise as much of this now runs four cores at 100% and the little Pi gets hot.
    #!/usr/bin/env python3
    import os
    import time

    def temperature_of_raspberry_pi():
        cpu_temp = os.popen("vcgencmd measure_temp").readline()
        return cpu_temp.replace("temp=", "")

    while True:
        print(temperature_of_raspberry_pi())
        time.sleep(2)
Configure and build Atlas. Do not manually use the -j flag. ATLAS already knows where to parallelize and where not. Do not interfere. ATLAS also uses varying types of arguments in subroutine calls so FFLAGS and FCFLAGS have to be set to allow this mismatch. Go back to the top level ATLAS directory, configure and make. Configure and make will take hours to complete, so go have a coffee or take a nap:
    $ cd ..
    $ ./configure FFLAGS=-fallow-argument-mismatch \
           FCFLAGS=-fallow-argument-mismatch
    $ make
Download MPI and install. I used MPICH’s latest version 4.0.1. Go to another convenient directory, get the archive, unpack, configure, make and install:
    $ wget https://www.mpich.org/static/downloads/4.0.1/mpich-
                   4.0.1.tar.gz
    $ tar xzvf mpich-4.0.1.tar.gz
    $ cd mpich-4.0.1
    $ ./configure
    $ make -j 4
    $ sudo make install
Download the actual benchmark code, HPL, extract and configure. Choose and go to yet another convenient directory. The current version of HPL at netlib is 2.2.
    $ wget http://www.netlib.org/benchmark/hpl/hpl-2.2.tar.gz
    $ tar xzvf hpl-2.2.tar.gz
    $ cd hpl-2.2
    $ cd setup
This creates a generic makefile that will be edited for the particulars of the RPi and copies it with a new name to the directory above. Then go there:
    $ sh make_generic
    $ cp Make.UNKNOWN ../Make.rpi
    $ cd ..
Edit Make.rpi to reflect your installation. These are the lines that are edited:
    ARCH = rpi
    TOPdir   = $(HOME)/hpl-2.2
    MPdir    = /usr/local
    MPinc    = -I $(MPdir)/include
    MPlib    = /usr/local/lib/libmpich.so
    LAdir    = /home/pi/atlas-build
    LAinc    =
    LAlib    = $(LAdir)/lib/libf77blas.a $(LAdir)/lib/libatlas.a
My version of the file with specifics to my system can be found here (link to Make.rpi):
Compile HPL
$ make arch=rpi
We need two more files to run HPL, a file to specify the numerical parameters for the linear algebra run and a file to tell MPI which nodes/cores on the computer(s) to use. Create a file in hpl-2.2/bin/rpi called rpi_nodes and put four lines in it that correspond to the four cores on the Pi:
    localhost
    localhost
    localhost
    localhost
Create the configuration file HPL.dat in hpl-2.2/bin/rpi needed to test the system.
Edit the provided HPL.dat input file. I used this version:
HPLinpack benchmark input file
Innovative Computing Laboratory, University of Tennessee
HPL.out      output file name (if any)
6            device out (6=stdout,7=stderr,file)
1            # of problems sizes (N)
5120         Ns
1            # of NBs
128          NBs
0            PMAP process mapping (0=Row-,1=Column-major)
1            # of process grids (P x Q)
2            Ps
2            Qs
16.0         threshold
1            # of panel fact
2            PFACTs (0=left, 1=Crout, 2=Right)
1            # of recursive stopping criterium
4            NBMINs (>= 1)
1            # of panels in recursion
2            NDIVs
1            # of recursive panel fact.
1            RFACTs (0=left, 1=Crout, 2=Right)
1            # of broadcast
1            BCASTs (0=1rg,1=1rM,2=2rg,3=2rM,4=Lng,5=LnM)
1            # of lookahead depth
1            DEPTHs (>=0)
2            SWAP (0=bin-exch,1=long,2=mix)
64           swapping threshold
0            L1 in (0=transposed,1=no-transposed) form
0            U  in (0=transposed,1=no-transposed) form
1            Equilibration (0=no,1=yes)
8            memory alignment in double (> 0)
Run the code with MPI specifying the nodes through rpi_nodes:
$ mpiexec -f rpi_nodes ./xhpl
Which produced the following output for this set of parameters.
==================================================================
HPLinpack 2.2  --  High-Performance Linpack benchmark  --   February 24, 2016

Written by A. Petitet and R. Clint Whaley,  Innovative Computing Laboratory, UTK
Modified by Piotr Luszczek, Innovative Computing Laboratory, UTK
Modified by Julien Langou, University of Colorado Denver
==================================================================An explanation of the input/output parameters follows:
T/V    : Wall time / encoded variant.
N      : The order of the coefficient matrix A.
NB     : The partitioning blocking factor.
P      : The number of process rows.
Q      : The number of process columns.
Time   : Time in seconds to solve the linear system.
Gflops : Rate of execution for solving the linear system.
The following parameter values will be used:
N      :    5120
NB     :     128
PMAP   : Row-major process mapping
P      :       2
Q      :       2
PFACT  :   Right
NBMIN  :       4
NDIV   :       2
RFACT  :   Crout
BCAST  :  1ringM
DEPTH  :       1
SWAP   : Mix (threshold = 64)
L1     : transposed form
U      : transposed form
EQUIL  : yes
ALIGN  : 8 double precision words
------------------------------------------------------------------- The matrix A is randomly generated for each test.
- The following scaled residual check will be computed:
      ||Ax-b||_oo / ( eps * ( || x ||_oo * || A ||_oo + || b ||_oo
) * N )
- The relative machine precision (eps) is taken to be               1.110223e-16
- Computational tests pass if scaled residuals are less than                16.0
==================================================================
T/V        N    NB     P     Q                Time       Gflops
------------------------------------------------------------------
WR11C2R4   5120 128    2     2                11.12      8.053e+00
HPL_pdgesv() start time Mon Feb 28 16:49:47 2022
HPL_pdgesv() end time   Mon Feb 28 16:49:58 2022
------------------------------------------------------------------
||Ax-b||_oo/(eps*(||A||_oo*||x||_oo+||b||_oo)*N)=        0.0020730
...... PASSED
==================================================================
Finished      1 tests with the following results:
1 tests completed and passed residual checks,
0 tests completed and failed residual checks,
0 tests skipped because of illegal input values.
------------------------------------------------------------------End of Tests.
==================================================================